
Education
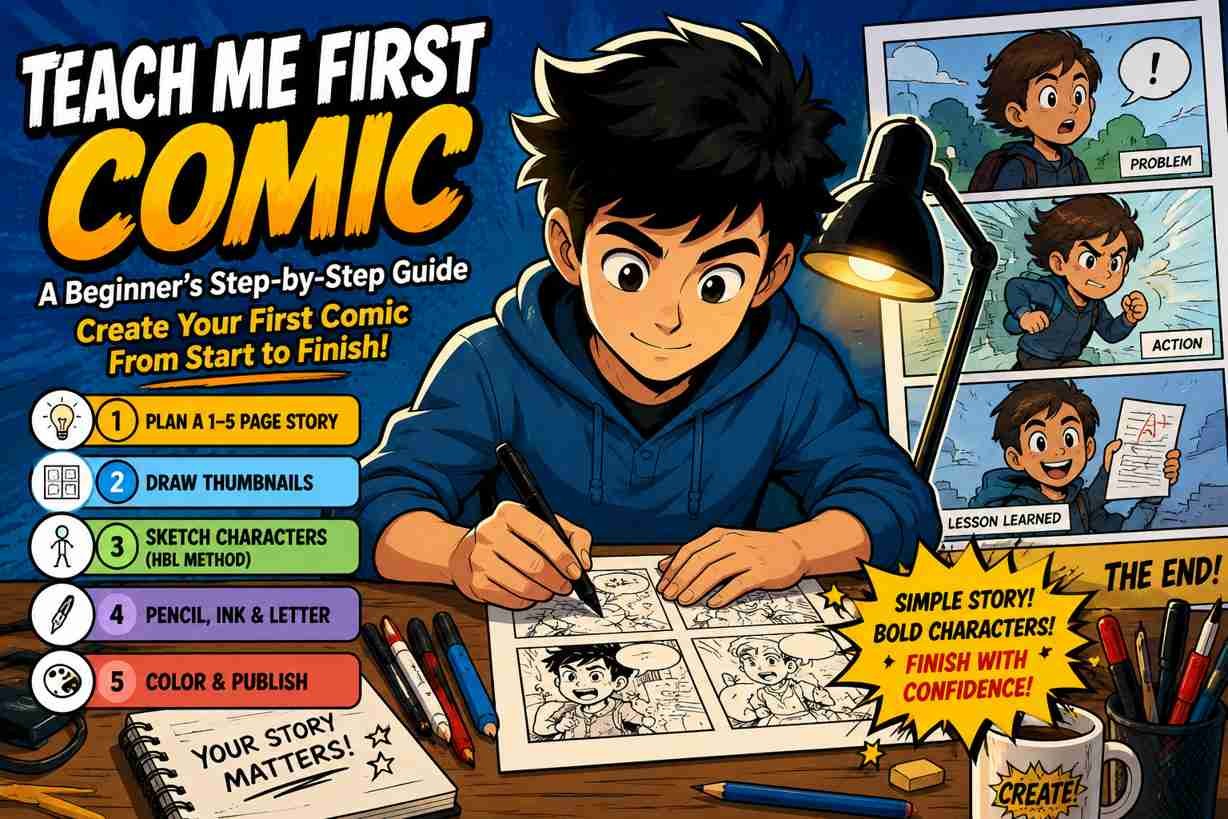
Teach Me First Comic Guide: How Beginners Can Create Their First Comic From Start to Finish
Creating your first comic can feel intimidating. Many beginners believe they need professional-level artwork, advanced storytelling skills, or years of experience before they can start. The truth is much simpler: the best way to learn comics is by making one.
The concept behind the teach me first comic approach is straightforward. Instead of spending months planning a massive graphic novel, beginners focus on creating a short, complete comic that teaches the fundamentals of visual storytelling. This method helps new creators understand pacing, panel layout, character design, dialogue, and page composition without becoming overwhelmed.
Whether you want to create comics as a hobby, build a webcomic series, or eventually publish your own graphic novel, starting small is the smartest path forward.
Why Beginners Should Start With a Short Comic
One of the biggest mistakes new comic creators make is attempting a huge project immediately. A 100-page story may sound exciting, but most beginners struggle to finish such ambitious projects.
A short comic allows you to:
- Learn storytelling fundamentals.
- Practice drawing panels.
- Understand page layouts.
- Improve character consistency.
- Gain confidence through completion.
Finishing a five-page comic teaches more than endlessly planning a fifty-page one. Every completed project provides valuable experience that can be applied to future work.
The teach me first comic philosophy emphasizes learning through action rather than endless preparation.
Step 1: Plan a Simple Story
Before drawing anything, create a basic story structure.
The easiest format follows three parts:
Beginning
Introduce a character and a problem.
For example, a student forgets their homework before school.
Middle
The character attempts to solve the problem.
Maybe they rush back home or ask a friend for help.
End
The problem is resolved, and the character learns something.
Perhaps they discover the importance of preparation and organization.
This simple structure helps beginners understand storytelling without dealing with complicated plots.
Keep the story between one and five pages. The goal is not to create a masterpiece but to complete a coherent narrative from start to finish.
Understanding Comic Storytelling
Comics combine words and images to tell a story. Unlike novels, comics rely heavily on visual communication.
Readers should understand what is happening even if there is very little dialogue.
Good comic storytelling often focuses on:
- Character actions
- Facial expressions
- Body language
- Panel arrangement
- Visual pacing
When planning your first comic, think about what readers can see rather than what characters can say.
The strongest comic pages often communicate emotions and actions visually.
Step 2: Create Thumbnail Sketches
Before drawing the final pages, comic artists create thumbnails.
Thumbnails are tiny, rough sketches that serve as a blueprint for the comic.
These sketches help you:
- Test page layouts.
- Organize panels.
- Control pacing.
- Identify storytelling problems early.
A thumbnail does not need detail.
Stick figures and rough boxes are enough.
For example:
Panel 1: Character enters room.
Panel 2: Character notices problem.
Panel 3: Character reacts.
Panel 4: Character attempts solution.
Panel 5: Problem solved.
This simple planning stage can save hours of work later.
Why Panel Layout Matters
Panel layout controls how readers experience the story.
Large panels slow the pace and emphasize important moments.
Smaller panels create speed and energy.
Beginners should keep layouts simple:
- Use rectangular panels.
- Follow left-to-right reading flow.
- Avoid overly complex page designs.
Clear storytelling is always more important than flashy layouts.
A simple page that is easy to read will usually be more effective than a confusing page filled with artistic experiments.
Step 3: Design Characters Using Simple Shapes
Many beginners worry too much about anatomy.
Professional artists spend years studying anatomy, but beginners do not need that level of complexity immediately.
A practical approach is using the HBL method:
Head
Start with a circle or oval.
Body
Use a rectangle, triangle, or oval shape.
Legs
Use simple lines or cylinders.
This framework makes character creation faster and easier.
The goal is consistency rather than perfection.
If readers can recognize your character from panel to panel, you are succeeding.
Creating Memorable Characters
Strong characters are not defined by artistic detail alone.
Readers remember characters because of their personalities and actions.
Consider giving your character:
- A unique hairstyle
- Distinct clothing
- Clear motivations
- Recognizable expressions
Even simple cartoon characters can become memorable when they have clear identities.
Focus on making your characters expressive rather than anatomically perfect.
Step 4: Pencil, Ink, and Lettering
Once your layout and characters are planned, begin drawing the final comic.
Most comic creators follow three stages.
Penciling
Draw rough outlines and shapes.
Do not worry about perfection.
Focus on placement and storytelling.
Inking
Trace over the pencil lines using a pen or marker.
Bold black lines improve clarity and make artwork easier to read.
Wait until the ink dries completely before moving to the next step.
Erasing
Remove the pencil lines carefully.
This leaves clean artwork ready for lettering and color.
Adding Dialogue and Word Balloons
Dialogue should support the artwork, not replace it.
Many beginner comics contain too much text.
Instead, keep conversations short and direct.
For example:
Instead of:
“I am extremely worried because I forgot my homework at home and now I don’t know what to do.”
Write:
“I forgot my homework!”
The artwork can show the panic.
This combination creates stronger storytelling.
Word balloons should also be placed carefully so readers naturally follow the conversation.
Step 5: Color and Final Touches
Color is optional but can greatly enhance a comic.
Traditional creators often use:
- Colored pencils
- Markers
- Watercolors
Digital artists commonly use software such as:
- Clip Studio Paint
- Procreate
- Photoshop
- Krita
Keep colors simple.
A limited color palette often looks more professional than using every color available.
The final stage is adding a title and reviewing the comic for mistakes.
Check:
- Spelling errors
- Missing dialogue
- Panel order
- Visual clarity
A few minutes of proofreading can significantly improve the finished product.
Publishing Your First Comic Online
Once your comic is complete, share it with readers.
Publishing helps you gain feedback and improve your skills.
Popular comic publishing platforms include:
Webtoon Canvas
One of the largest platforms for independent creators.
GlobalComix
Offers tools for publishing and discovering comics.
Tapas
Popular among webcomic artists and storytellers.
Social Media
Instagram, X, Facebook, and Reddit communities can help creators reach new audiences.
Publishing your work is an important part of the learning process.
Even professional artists started by sharing beginner projects.
Common Mistakes Beginners Should Avoid
New creators often encounter the same challenges.
Starting Too Big
Keep your first project short and manageable.
Overcomplicated Artwork
Simple drawings are enough to tell a good story.
Too Much Dialogue
Let the images communicate whenever possible.
Skipping Thumbnails
Planning saves time and improves storytelling.
Never Finishing Projects
A finished imperfect comic is better than an unfinished perfect idea.
Completing projects builds confidence and experience.
Final Thoughts
The teach me first comic approach is built around one simple principle: learn by creating. You do not need professional art skills, expensive software, or years of experience to make your first comic.
Start with a short story, create rough thumbnails, design simple characters, draw your pages, add dialogue, and publish your work. Every comic you finish will teach you something new about storytelling, pacing, and visual communication.
Remember that your first comic does not need to be perfect. Its purpose is to help you understand the creative process and develop the skills needed for future projects.
The most important step is simply starting—and finishing.
More Details : Canon Event Meaning: Understanding the Viral Phrase and Why It Matters
FAQs
1. How many pages should my first comic be?
A beginner comic should ideally be between one and five pages long.
2. Do I need professional drawing skills to create a comic?
No. Simple artwork can effectively tell a great story if the storytelling is clear.
3. What are thumbnails in comic creation?
Thumbnails are small rough sketches used to plan panel layouts and story flow before drawing final pages.
4. Should I write a script before drawing?
Yes. A simple script helps organize your beginning, middle, and ending before creating artwork.
5. Where can I publish my first comic?
Popular options include Webtoon Canvas, GlobalComix, Tapas, and social media platforms.

Power Apps for App Integration: Connecting Your Business Systems

What Southwark Architects Know About This Borough That Outsiders Always Get Wrong

Why Most Travel Businesses Lose Bookings Before Hello

Overcoming Financial Overload in the Golden State

How Test Automation Fits Into Modern DevOps Pipelines

How to Deploy Keycloak Using Docker

Tutto Passa: Understanding the Meaning, Philosophy, and Life Lessons Behind This Powerful Expression

What Is an SSL Handshake? A Complete Guide to Secure Website Connections

Steam Free Games Forever: A Complete Guide to Playing Great PC Games Without Spending Money

Best Time to Visit Japan: A Complete Seasonal Guide for Every Traveler

Dungeon Crawler Carl TV Show: Everything We Know About the Upcoming Adaptation

10 Best Books for Time Management to Improve Productivity and Focus in Daily Life

Finance for Salons: Starting Your First Beauty Business

High Ticket Affiliate Marketing: Smart Ways to Earn Bigger Affiliate Commissions Online

Fiona Cauley: The Inspiring Comedian Changing Modern Stand-Up

Durable, Recyclable, and Stunning: The Market Advantages of BOPP Glossy Film Packaging

Code 404 TV Series Review: A Clever Blend of Crime, Comedy, and Science Fiction

Best Rappers of All Time: 50 Hip-Hop Legends Who Changed Music Forever

How Backend Outsourcing Can Improve Agency Profit Margins Without Compromising Delivery?

Best Chess Openings for Beginners: 10 Smart Openings That Help You Win More Games
Power Apps for App Integration: Connecting Your Business Systems
What Southwark Architects Know About This Borough That Outsiders Always Get Wrong
Why Most Travel Businesses Lose Bookings Before Hello
Overcoming Financial Overload in the Golden State
How Test Automation Fits Into Modern DevOps Pipelines
How to Deploy Keycloak Using Docker
Tutto Passa: Understanding the Meaning, Philosophy, and Life Lessons Behind This Powerful Expression
What Is an SSL Handshake? A Complete Guide to Secure Website Connections
Steam Free Games Forever: A Complete Guide to Playing Great PC Games Without Spending Money
Best Time to Visit Japan: A Complete Seasonal Guide for Every Traveler
-

 Tech5 months ago
xxx is equal to 2022: A Complete Informative Explanation of a Cubic Equation
-
 Entertainment5 months ago
The Artistic World of Gege Akutami: A Mastermind Behind Jujutsu Kaisen
-

 Celebrity4 months ago
Izzie Balmer Partner: A Deep Dive into the Relationship with Will Hawley
-

 Entertainment4 months ago
Semana Santa 2026: Dates, Traditions, and Global Celebrations