
Lifestyle
A Practical Guide to Drawing Faces with the Loomis Method
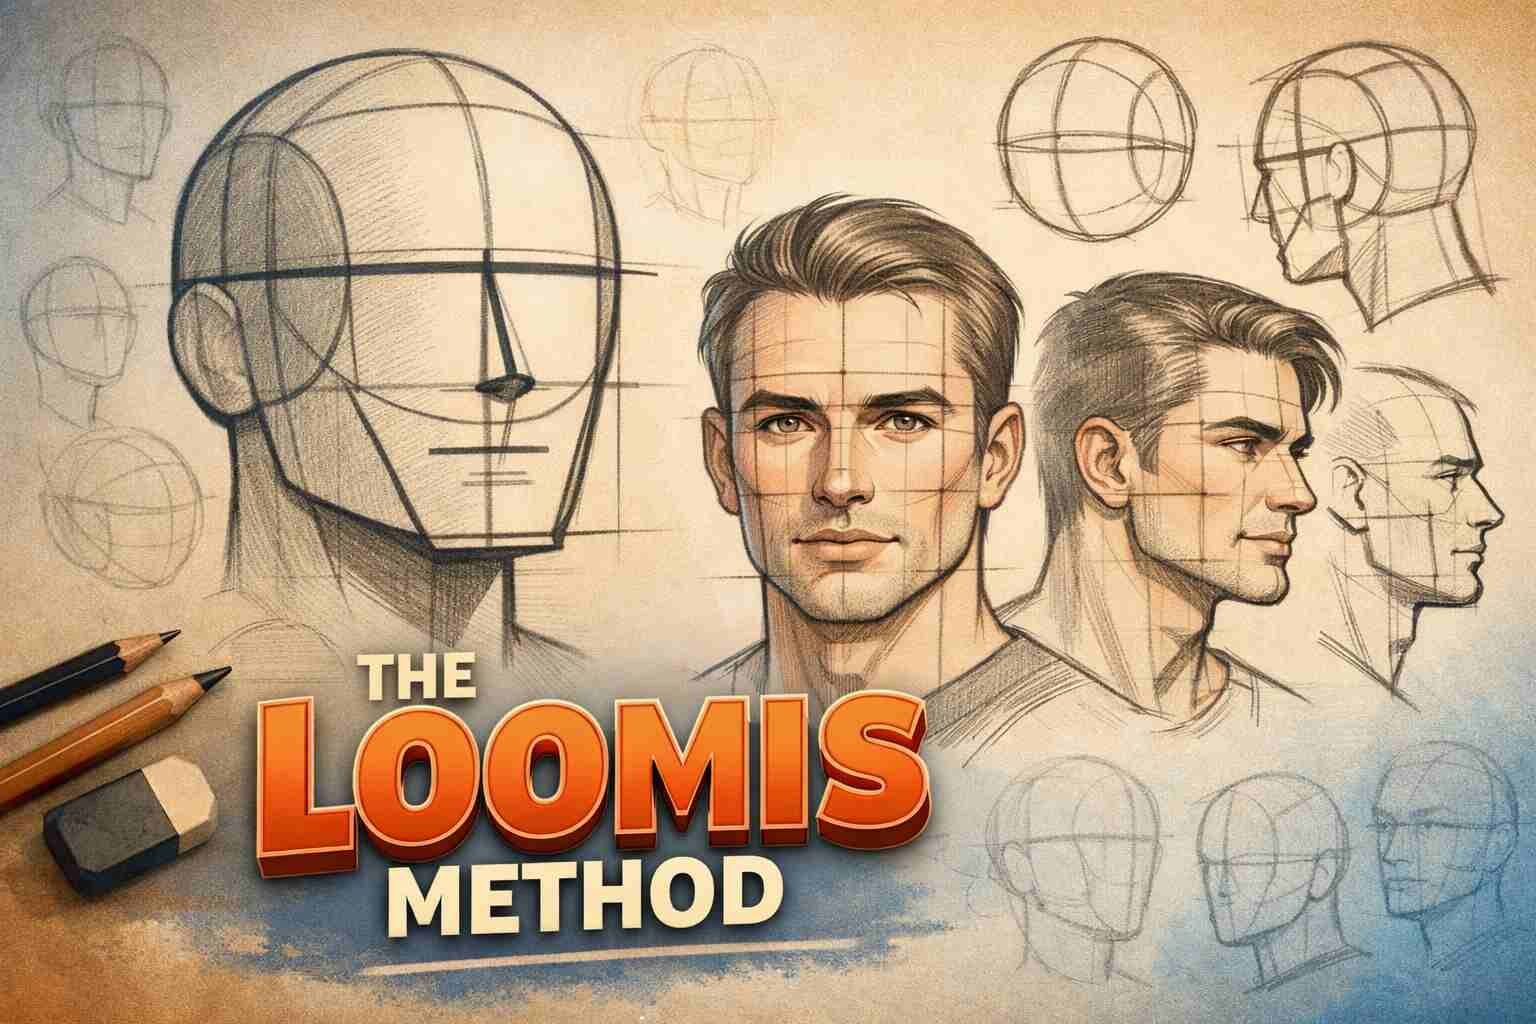
The Loomis Method is one of the most trusted techniques for learning how to draw human heads with accuracy and consistency. Developed by illustrator Andrew Loomis, this approach simplifies complex facial structures into basic geometric forms, making it easier for beginners and professionals alike. Instead of guessing proportions, artists use a structured system that ensures balance and realism.
What makes this method effective is its clarity. It breaks down the head into a sphere and guiding lines, allowing you to map out facial features with precision. Whether you’re working on portraits, character design, or comics, understanding this technique gives you a strong foundation. Once mastered, it becomes second nature and allows for more creative freedom.
Understanding the Basic Head Structure
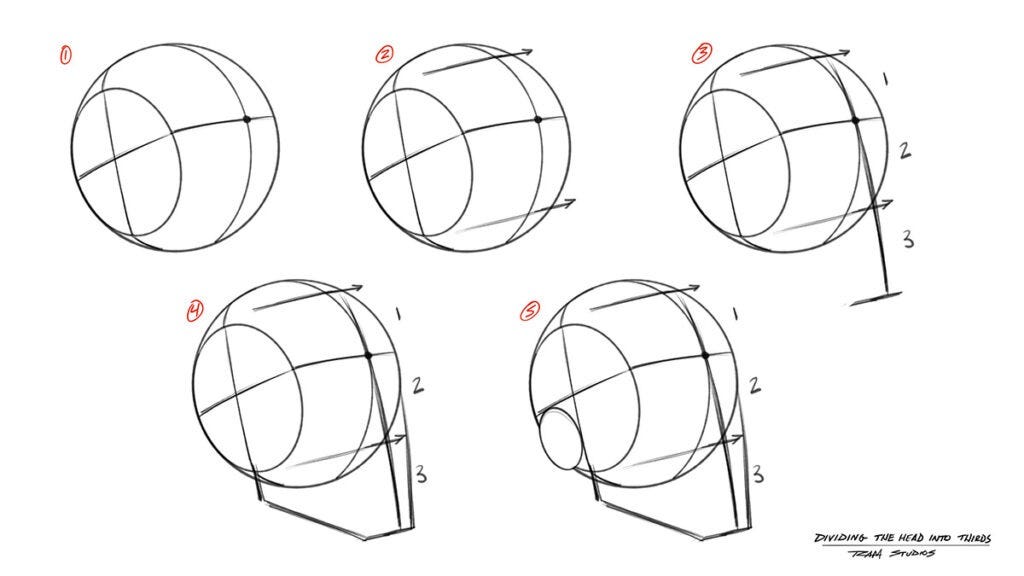

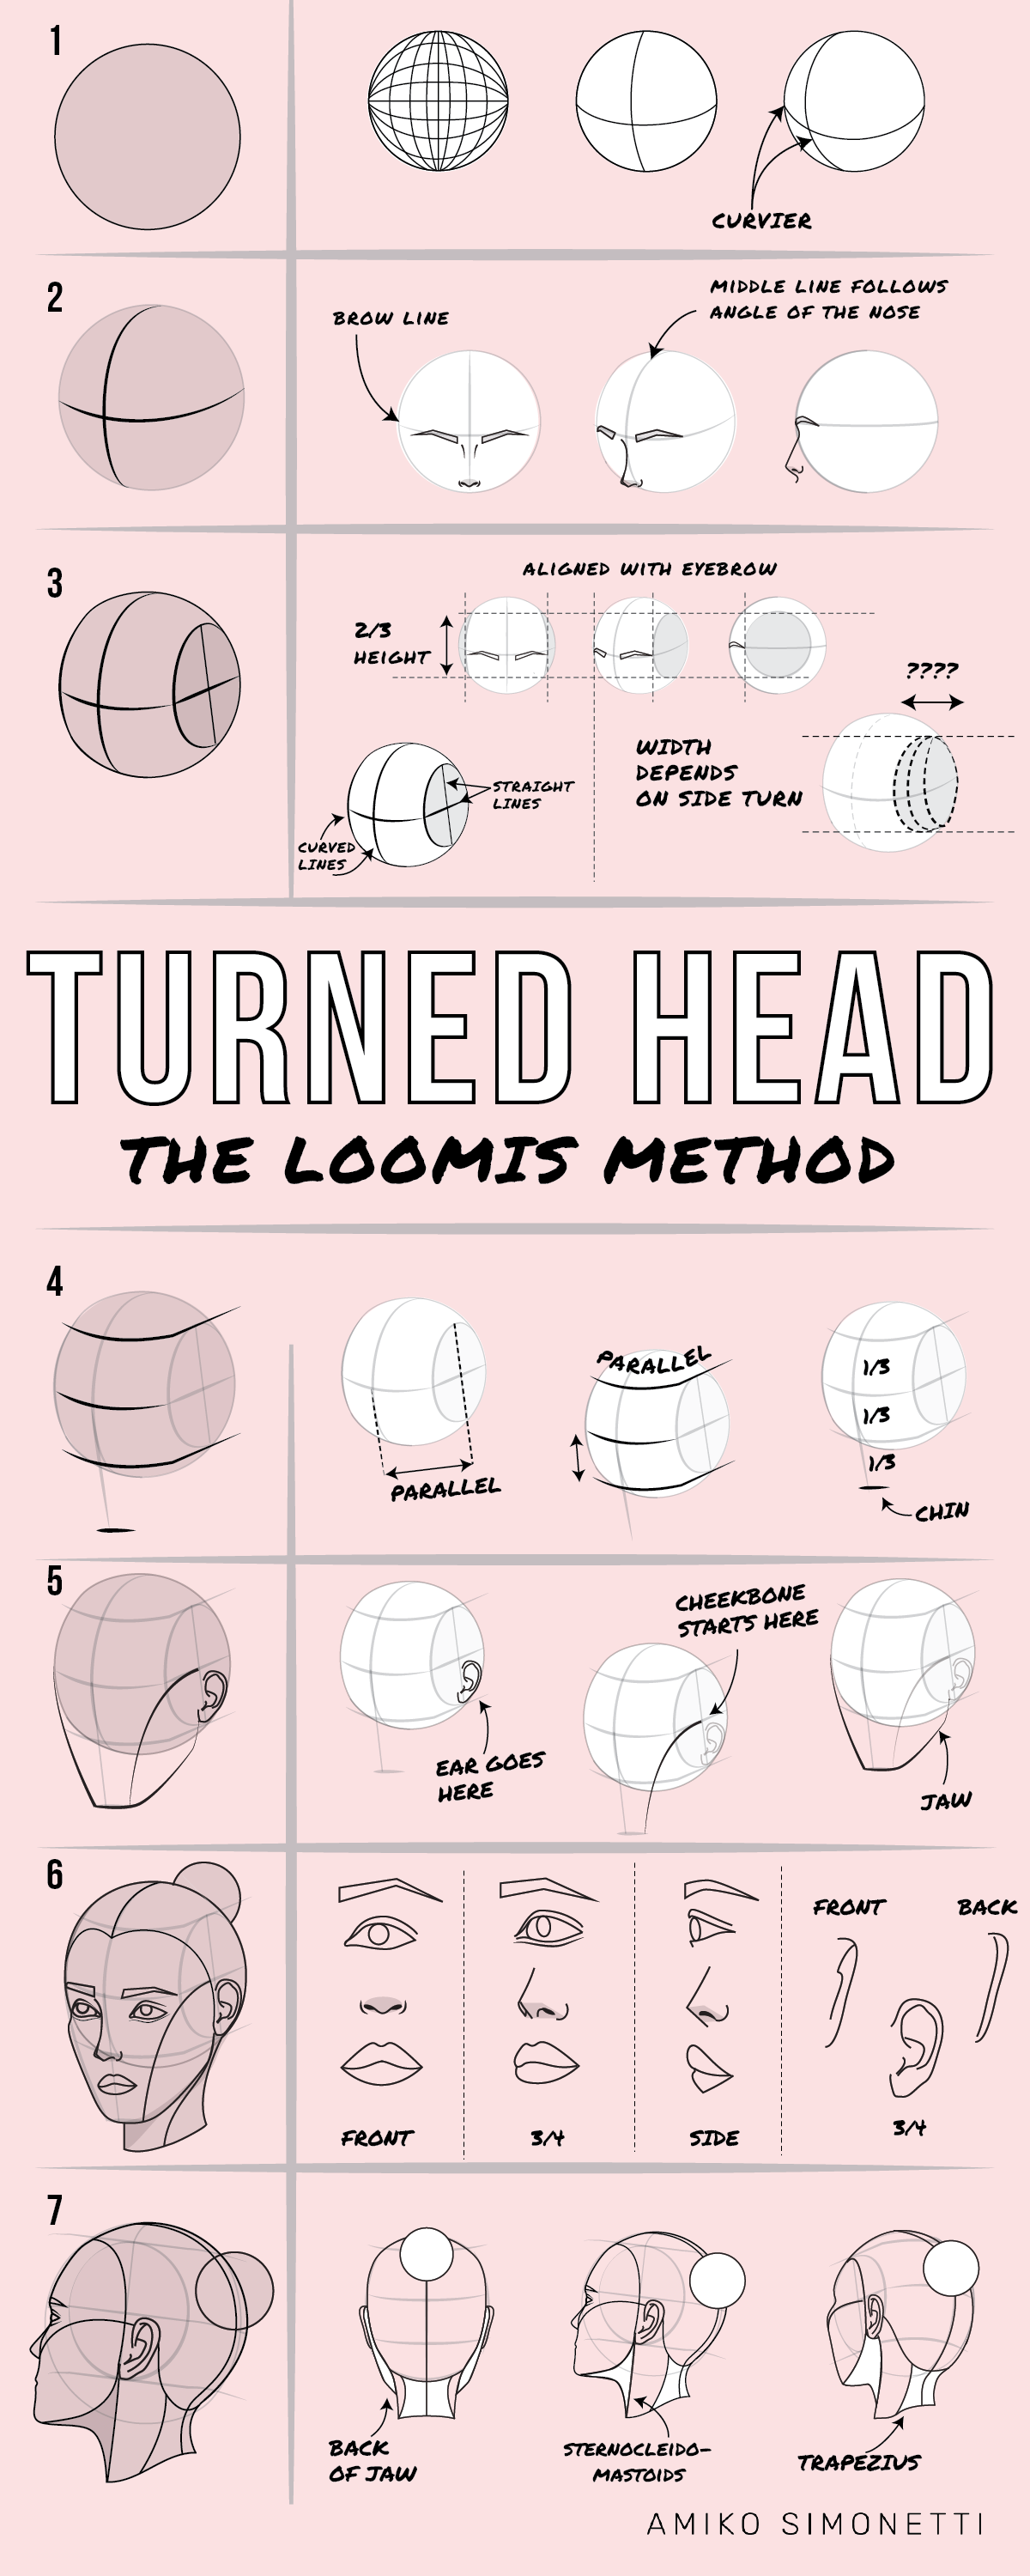
At the core of the Loomis approach is the idea that the human head can be simplified into a sphere with added structure. The sphere represents the cranium, while the jaw is attached to form the complete head shape. This simple breakdown helps artists avoid common mistakes in proportions.
The first step is drawing a circle. Then, the sides of the head are flattened slightly to represent the temples. A vertical and horizontal guideline is added across the sphere to mark the center and eye line. These lines act as anchors for placing facial features accurately.
By thinking of the head as a 3D object rather than a flat surface, you can rotate it in different directions with ease. This is especially useful for drawing faces from various angles without losing proportion.
Mapping Facial Proportions Correctly
4
One of the biggest advantages of the Loomis system is how it organizes facial proportions. The face is divided into equal sections, making it easier to place features consistently.
The horizontal line drawn through the center of the sphere marks the eye level. From there, the face is divided into thirds: the hairline, the brow line, and the base of the nose. The mouth usually sits between the nose and chin, slightly above the halfway point.
This structured layout removes guesswork. Instead of relying on intuition alone, you follow a proven framework. Over time, your eye becomes trained to recognize these proportions naturally, improving both speed and accuracy.
Drawing the Head from Different Angles
A major strength of the Loomis approach is its ability to handle perspective. Because the head is built from a sphere, you can rotate it in any direction by adjusting the guidelines.
For a side view, the center line shifts toward the edge of the sphere. For a three-quarter view, it curves slightly, indicating the direction the face is turning. This flexibility allows artists to draw dynamic and realistic poses without starting from scratch each time.
Practicing different angles is essential. It helps you understand how facial features change with perspective. The more you experiment, the more confident you become in drawing heads from imagination.
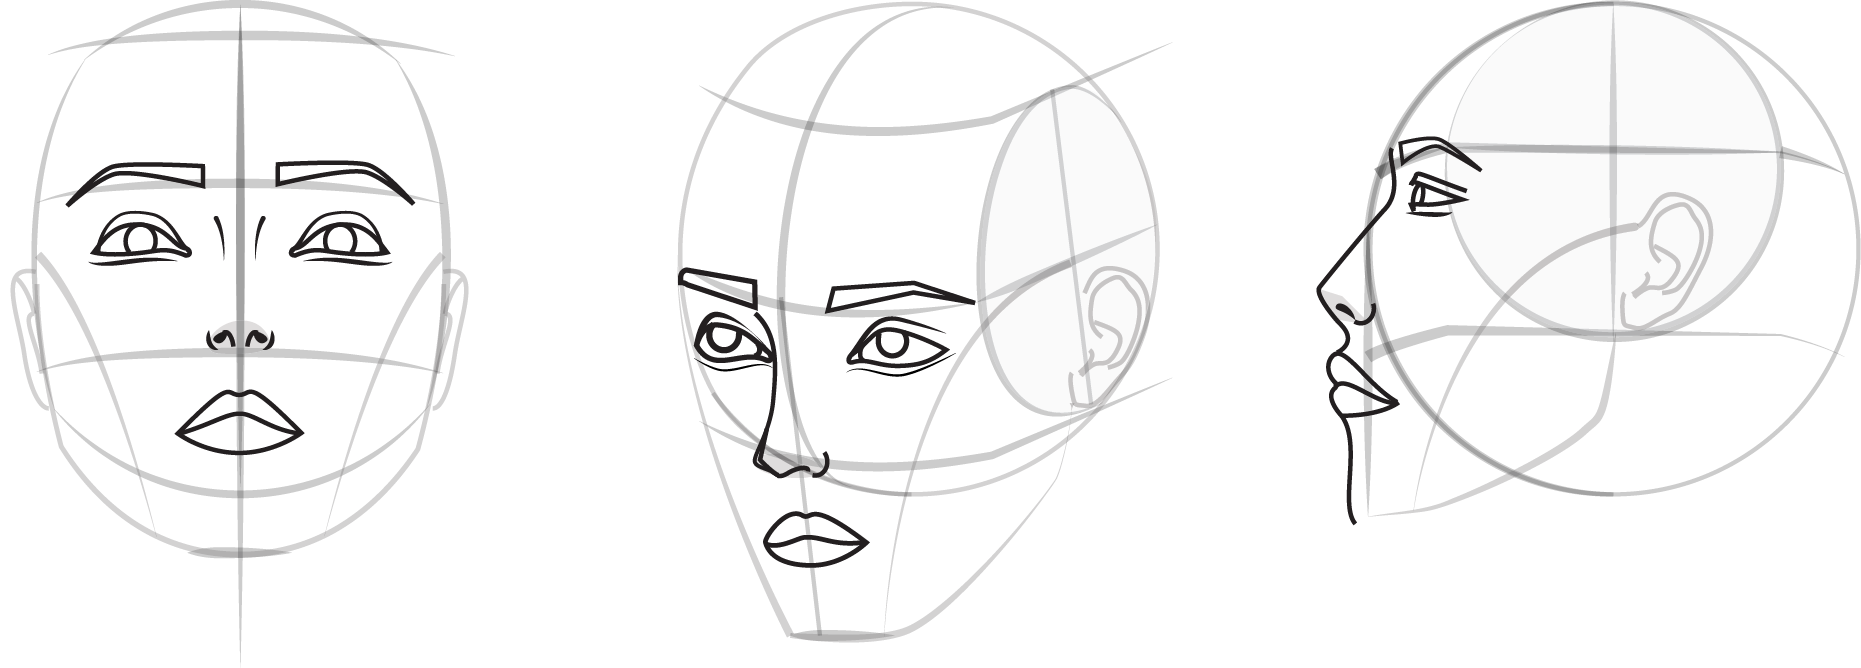
Adding Facial Features with Accuracy
Once the structure is in place, the next step is adding details like eyes, nose, and mouth. Because the guidelines are already established, placing these features becomes much easier.
Eyes are positioned along the central horizontal line, with equal spacing between them. The width of one eye typically fits between both eyes. The nose extends down from the brow line, while the mouth sits below it, aligned with the center of the face.
This method ensures symmetry and balance. Instead of drawing features randomly, you follow a system that keeps everything in proportion. As you gain experience, you can adjust these rules slightly to match different face types and expressions.
Refining the Jaw, Chin, and Hairline
After placing the facial features, refining the outer structure of the head is important. The jawline defines the character of the face, whether it’s sharp, soft, or angular. The chin connects smoothly to the jaw, completing the lower part of the head.
The hairline is usually placed above the brow line, following the natural curve of the skull. It’s important not to draw hair as a flat shape. Instead, think of it as volume sitting on top of the head structure.
These refinements bring the drawing closer to realism. Small adjustments in the jaw or hairline can significantly change the appearance of the character.
Common Mistakes to Avoid
Many beginners struggle when first learning the Loomis system. One common mistake is skipping the construction phase and jumping straight into details. This often leads to uneven proportions and distorted features.
Another issue is drawing the head too flat. Remember that the method is based on a 3D form. Ignoring this can make your drawings look stiff. Also, placing features without following the guidelines can result in misalignment.
Consistency is key. Practicing the basic structure repeatedly helps build muscle memory. Over time, these mistakes become easier to avoid.
Practical Exercises to Improve Faster
To get better results, regular practice is essential. Start by drawing simple head constructions without details. Focus on getting the proportions right before adding features.
Try sketching heads from different angles daily. Use references at first, then gradually move to drawing from imagination. Another effective exercise is studying real faces and breaking them down using the Loomis framework.
Repetition builds confidence. The more you practice, the more natural the process becomes. Eventually, you won’t need to rely heavily on guidelines.
Why Artists Still Use This Method Today
Even in the digital age, the Loomis Method remains widely used by artists. Its simplicity and effectiveness make it a reliable tool for learning and improving drawing skills.
Professional illustrators, comic artists, and animators often rely on this technique because it provides a consistent structure. It also adapts well to different styles, from realistic portraits to stylized characters.
Learning this method doesn’t limit creativity. Instead, it gives you control over your drawings, allowing you to experiment confidently while maintaining accuracy.
Conclusion
The Loomis Method offers a clear and practical way to understand head construction and facial proportions. By breaking the head into simple shapes and using guidelines, it removes the confusion many beginners face.
With consistent practice, this approach becomes an essential part of your drawing process. It helps you create balanced, realistic faces from any angle. Whether you’re just starting or looking to refine your skills, mastering this technique is a valuable step forward in your artistic journey.
More Details : The Smart Traveler’s Packing List: Pack Less, Travel Better
FAQs
1. What is the Loomis Method used for?
It is used to draw human heads with accurate proportions and structure.
2. Is the Loomis Method good for beginners?
Yes, it simplifies complex anatomy into basic shapes, making it ideal for beginners.
3. Can I use this method for digital art?
Yes, it works equally well for traditional and digital drawing.
4. How long does it take to learn this method?
With regular practice, you can understand the basics within a few weeks.
5. Do professionals still use the Loomis Method?
Yes, many professional artists use it as a foundation for drawing faces.

How to Start a Conversation Without Feeling Awkward

Best Free Mac Cleaners: Tools to Boost Your Mac’s Speed and Storage

How to Fix the P0420 Engine Code: Catalyst System Efficiency Below Threshold

Let Your Child Play Quotes: Encouraging Healthy Development Through Play

How to Download All Snapchat Memories: A Complete Guide

How to Ask a Girl Out: A Simple Guide to Making the First Move

Twisted Games by Ana Huang: A Captivating Review of the Forbidden Romance Novel

First Date Questions: 33 Smart and Engaging Questions to Ask

Claude Cowork: Transforming the Modern Workspace

Inspiring Thought of the Day in English: Boost Your Mindset and Motivation

Latest Breakthroughs in Quantum Computing 2024: Major Innovations Shaping the Future of Technology

Understanding Black Box AI: Unlocking the Secrets of Unexplained Algorithms

Encanto Characters Explained: The Madrigal Family, Their Gifts, and What They Mean

Makima Chainsaw Man: The Power, Mystery, and Meaning Behind One of Anime’s Most Talked About Characters

The Red String Theory: Exploring Fate and Connection

Best AI Tools to Create Professional Faceless Videos Quickly

10 Things You Should Know About Yuta Okkotsu Before Jujutsu Kaisen Season 3

NVIDIA DGX Spark: A Practical Look at the Compact AI Powerhouse

Open Claw vs. Claude Code: A Comprehensive Comparison

Dolores Encanto: Understanding the Quiet Strength of a Unique Character
How to Start a Conversation Without Feeling Awkward
Best Free Mac Cleaners: Tools to Boost Your Mac’s Speed and Storage
How to Fix the P0420 Engine Code: Catalyst System Efficiency Below Threshold
Let Your Child Play Quotes: Encouraging Healthy Development Through Play
How to Download All Snapchat Memories: A Complete Guide
How to Ask a Girl Out: A Simple Guide to Making the First Move
Twisted Games by Ana Huang: A Captivating Review of the Forbidden Romance Novel
First Date Questions: 33 Smart and Engaging Questions to Ask
Claude Cowork: Transforming the Modern Workspace
Inspiring Thought of the Day in English: Boost Your Mindset and Motivation
-

 Entertainment2 months ago
Semana Santa 2026: Dates, Traditions, and Global Celebrations
-

 Tech2 months ago
xxx is equal to 2022: A Complete Informative Explanation of a Cubic Equation
-

 Entertainment2 months ago
The Artistic World of Gege Akutami: A Mastermind Behind Jujutsu Kaisen
-

 Celebrity2 months ago
Izzie Balmer Partner: A Deep Dive into the Relationship with Will Hawley